Facebook is a fantastic tool for connecting people all around the world, sharing their thoughts and perspectives through status updates, emoji and stickers, photos and even videos. If you want to upload a video to Facebook, the process is essentially the same whether you use a desktop, a laptop, or a mobile device.
Posting a Facebook Video
Your options will look slightly different depending on whether you are posting a status update from your home screen or from the news feed page. This tutorial will cover both scenarios regardless of what device you are using.
Step 1: Open a blank status update in Facebook. You can type in a message or you can wait to do this in a later step.
Step 2: On a desktop or laptop computer, you can post a status update from your main news feed, accessed by clicking on the "Home" link in the top blue navigation bar. When you click on the text entry box for your status update, several options will appear below. Choose "Photo/Video" to upload one video or "Photo Album" to upload multiple videos.

If you decide to post the status update from your own personal profile page, you will see a slightly different list of options. Your personal page is accessed by clicking on your name on the top blue navigation bar. You can use "Status" or "Life Event" as part of your video post if you wish, or you can proceed directly to clicking on the "Photo/Video" option. Clicking on Status will simply place your cursor down into the status update to start writing. Clicking on "Life Event" will bring up a drop down menu of typical "life events" like a new job or a new baby. Once you click either of these, you can then click on "Photo/Video" to post the video.

If you are using a mobile device, the status update will look slightly different and again, the screens will look a bit different depending on whether you are posting from your news feed or from your personal page. In either case, you should select "Photo." This is the option with the green camera icon to its left. This may be confusing since it only says "photo," but this option is indeed also for video uploads.

Step 3: A window will pop up displaying your computer files or the gallery on your phone, except if you are posting a video from your personal profile page on Facebook. In that case, you will see a screen offering the option of "Upload Photos/Videos" and "Create Photo/Video Album." You want to choose the first option.
Now, find the video you want to upload to Facebook:
- On a computer, click on the file and then on the "Open" button.
- On a mobile device, tap on the video in your gallery. You will see a blue outline around the video you have chosen and a "1" in the top right corner. Click on the "Done" link on the top right.
Step 4: You will now be back at your status update in Facebook and you will see the video being uploaded. Depending upon the size of the video file, this can take some time. A progress bar indicates how much of the file has been successfully uploaded.
Step 5: While the video is uploading, you can type in text in the status update. You can also tag people, add an emoticon, or note the video location. You can also use the Friends drop-down option to define your video privacy settings.
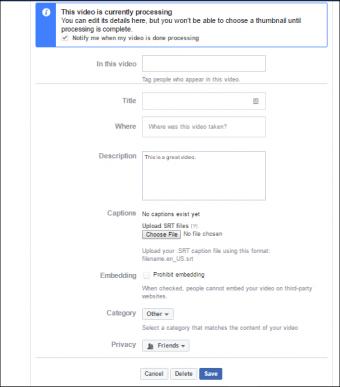
Step 6: Once the video has processed, you may have the option of closing the notification box or you may edit the video. If you do not see an option to edit your video, don't worry as you'll have a chance later. If you do see the edit option and want to edit the video, you have several options.

You can:
- Tag friends: Type in the names of friends in the "In this video" box. They should auto-populate after you type in the first few letters of each person's name.
- Add a title: Type in a title for the video in the "Title" box.
- Add a location: Type in the location where the video was taken in the "Where" box.
- Add a description: In the "Description" box, add your desired text describing your video.
- Add captions: If you have one, you can attach a caption (.srt) file to the video.
- Change embedding permissions: You can check this box to preclude people from embedding your video on any other websites.
- Select category: You can pick a category for the video from Facebook's pre-selected list or leave it as the default "Other."
- Change privacy settings: You can set the video to only be seen by friends, only yourself, or have anyone on Facebook able to view it. You can also customize it further and allow certain groups of friends only to see it.
On a mobile device, you will have all the same options, but the screen will look slightly different depending on your device.
Once you are done making any edits, hit Save.
Step 7: The video will now post to your page. Be aware that if it's a large video, it may not publish instantly.
Step 8: Once it has posted to your page, you can also edit it. To do this, look to the top of the status update where your name is. Underneath will be a time and date (or just a time if it's been less than 24 hours and you are on the same date). If you hover over it, you will see the complete date and time pop up underneath your cursor (see image below). Click on the time/date link to get to the next screen.

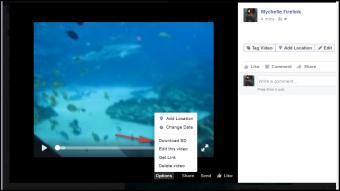
Step 9: You will now be on a screen that only shows your post and the video. Look down at the bottom of the video and click on the "Options" link. This will bring up a menu with several choices. Click on "Edit this video."

You will now see the same list of options that are described in Step 6, with one addition. You can also edit the thumbnail for the video by clicking through the pictures and choosing the one you prefer. When you're done, hit Save.
More Options After Uploading
Congratulations, you have now successfully posted a video to Facebook!
You can go back any time you wish and make further edits using the steps listed above. You can also delete the video using the same steps to get to the editing screen. If you want to share you video with others who may not be on Facebook, the edit options also give you the ability to get a link that you can share in emails and elsewhere on the Internet.


